From the Terminal
Ignoring SAPI with Symfony VarDumper
<?php
$varCloner = new \Symfony\Component\VarDumper\Cloner\VarCloner();
$cliDumper = new \Symfony\Component\VarDumper\Dumper\CliDumper();
echo $cliDumper->dump($varCloner->cloneVar($query), true);
Quick way to output full text instead of HTML when SAPI is not CLI
The case for system wide dependency injection in PHP
So first let me clarify what I mean when I say "system wide dependency injection".
The typical PHP Composer project offers "project-wide" dependency injection. The autoloader is made for your project and you simply require that one file. However, with other languages it's typical for dependencies to be in a shared folder for the entire system.
In composer we could use a "global" directory in global mode as well like this.

The problem is it's only global "for you". So if you decided to run composer global for another user all the packages you have installed would be different. So it's not global. Not even system-wide really since the home directory might not allow read from other users.
So neither of these modes in composer are really system wide.
In other languages system wide dependencies are stored like so.
For example here's Python.

Perl too.

And Ruby.

Okay so what about PHP?
To fill this hole some Linux developers who choose to include PHP code directly in the system have started to build packages for their distro's package managers.

Here we have the install script for symfony-console in portage. You can see the files are actually stored in /usr/share/php. Unfortunately these files don't have automatically generated autoloaders by composer making integrations very messy.

Portage users aren't the only ones.

Clearly some users choose to install PHP code for use system wide.
/usr/share/ or /usr/lib
Let's check the Linux Foundation's documentation on the topic.


Even though PHP code isn't architecture dependent, in my opinion, it's more of a library for programming so to that end I think it makes more sense to use /usr/lib or in my case /usr/lib64 just like other scripting languages. It would also avoid the messy businesses of integrating with none composer package managers.
I decided to go ahead and experiment with this idea.
I forked composer and made a composer system command. Just like composer global sets the folder to ~/.config/composer/, with the system command it instead sets the folder to /usr/lib64/php or /usr/lib/php if they exist in that order. You must create /usr/lib{64}/php yourself.
The fork of composer is available here: https://github.com/hparadiz/composer
I then loaded in some really awesome PHP libraries.

With this newfound power to no longer have to bundle libs with my scripts I made a database backup utility for this blog in 50 lines of code with SSH tunneling that drops sql.gz to my local home folder.
Feel free to fork it and make your own.

I had the script output to a Dropbox folder since I have it running already. Which is awesome since that's three locations and one of them is managed for me. I'll be hacking at this some more but for now I like this starting place.
I like that this script is fully portable and editable wherever it is. If I compile it to a phar it would be difficult to make changes or loop it for multiple databases without setting up an entire build configuration despite that logic being relatively simple even for a novice.
For me, at least, the reasons to allow composer to manage dependencies at a system wide level instead of having other package managers do it is self evident.
Installing XDebug on anything for VSCode in 5 minutes (XDebug 2.x)
Update 2/25/2021: This guide is for XDebug 2.x only.
I see a lot of over complicated guides on XDebug so I'll simplify things real quick for everyone.
Visual Studio Code has debugging support out of the box. Click on the Debug icon in the left bar (OS X: ⇧⌘D, Windows / Linux: CTRL+SHIFT+D) then click on the cog icon which should open your launch.json file or create one if none exists.
You must have the PHP XDebug extension installed of course.

Now add this to your launch.json file you have open:
        {
            "type": "php",
            "request": "launch",
            "name": "Listen For XDebug",
            "port": 9000,
            "pathMappings": {
                "/var/www/": "${workspaceRoot}"
            },
            "xdebugSettings": {
                "max_children": 256,
                "max_data": -1,
                "max_depth": 5
            },
            "ignore": [
                "**/vendor/**/*.php"
            ]
        }
Make sure you change /var/www/ to where your code is on your local server.
Set this in your php.ini
[xdebug]
xdebug.remote_enable = 1
xdebug.remote_autostart = 1
xdebug.profiler_enable_trigger = 1
You might need to do it twice. Once for CLI and once for PHP-FPM!
Typical locations for your php.ini file:
- Linux: /etc/php/{$version}/php.ini
- macOS (Homebrew): /usr/local/etc/php/{$version}/php.ini
Don't forget to restart php-fpm!
Now start the debugger by hitting the green play button.
Infinity
I always think about how if you count from one to infinity; within that infinity of numbers exists every movie, book, photograph, software or game, video, song or sound, work of art, insignificant doodle, and master piece of conscious thought in every file format you can image and yet to be invented and never to be invented.
All of that is in this simple loop
i=1;while(i) { i++; }
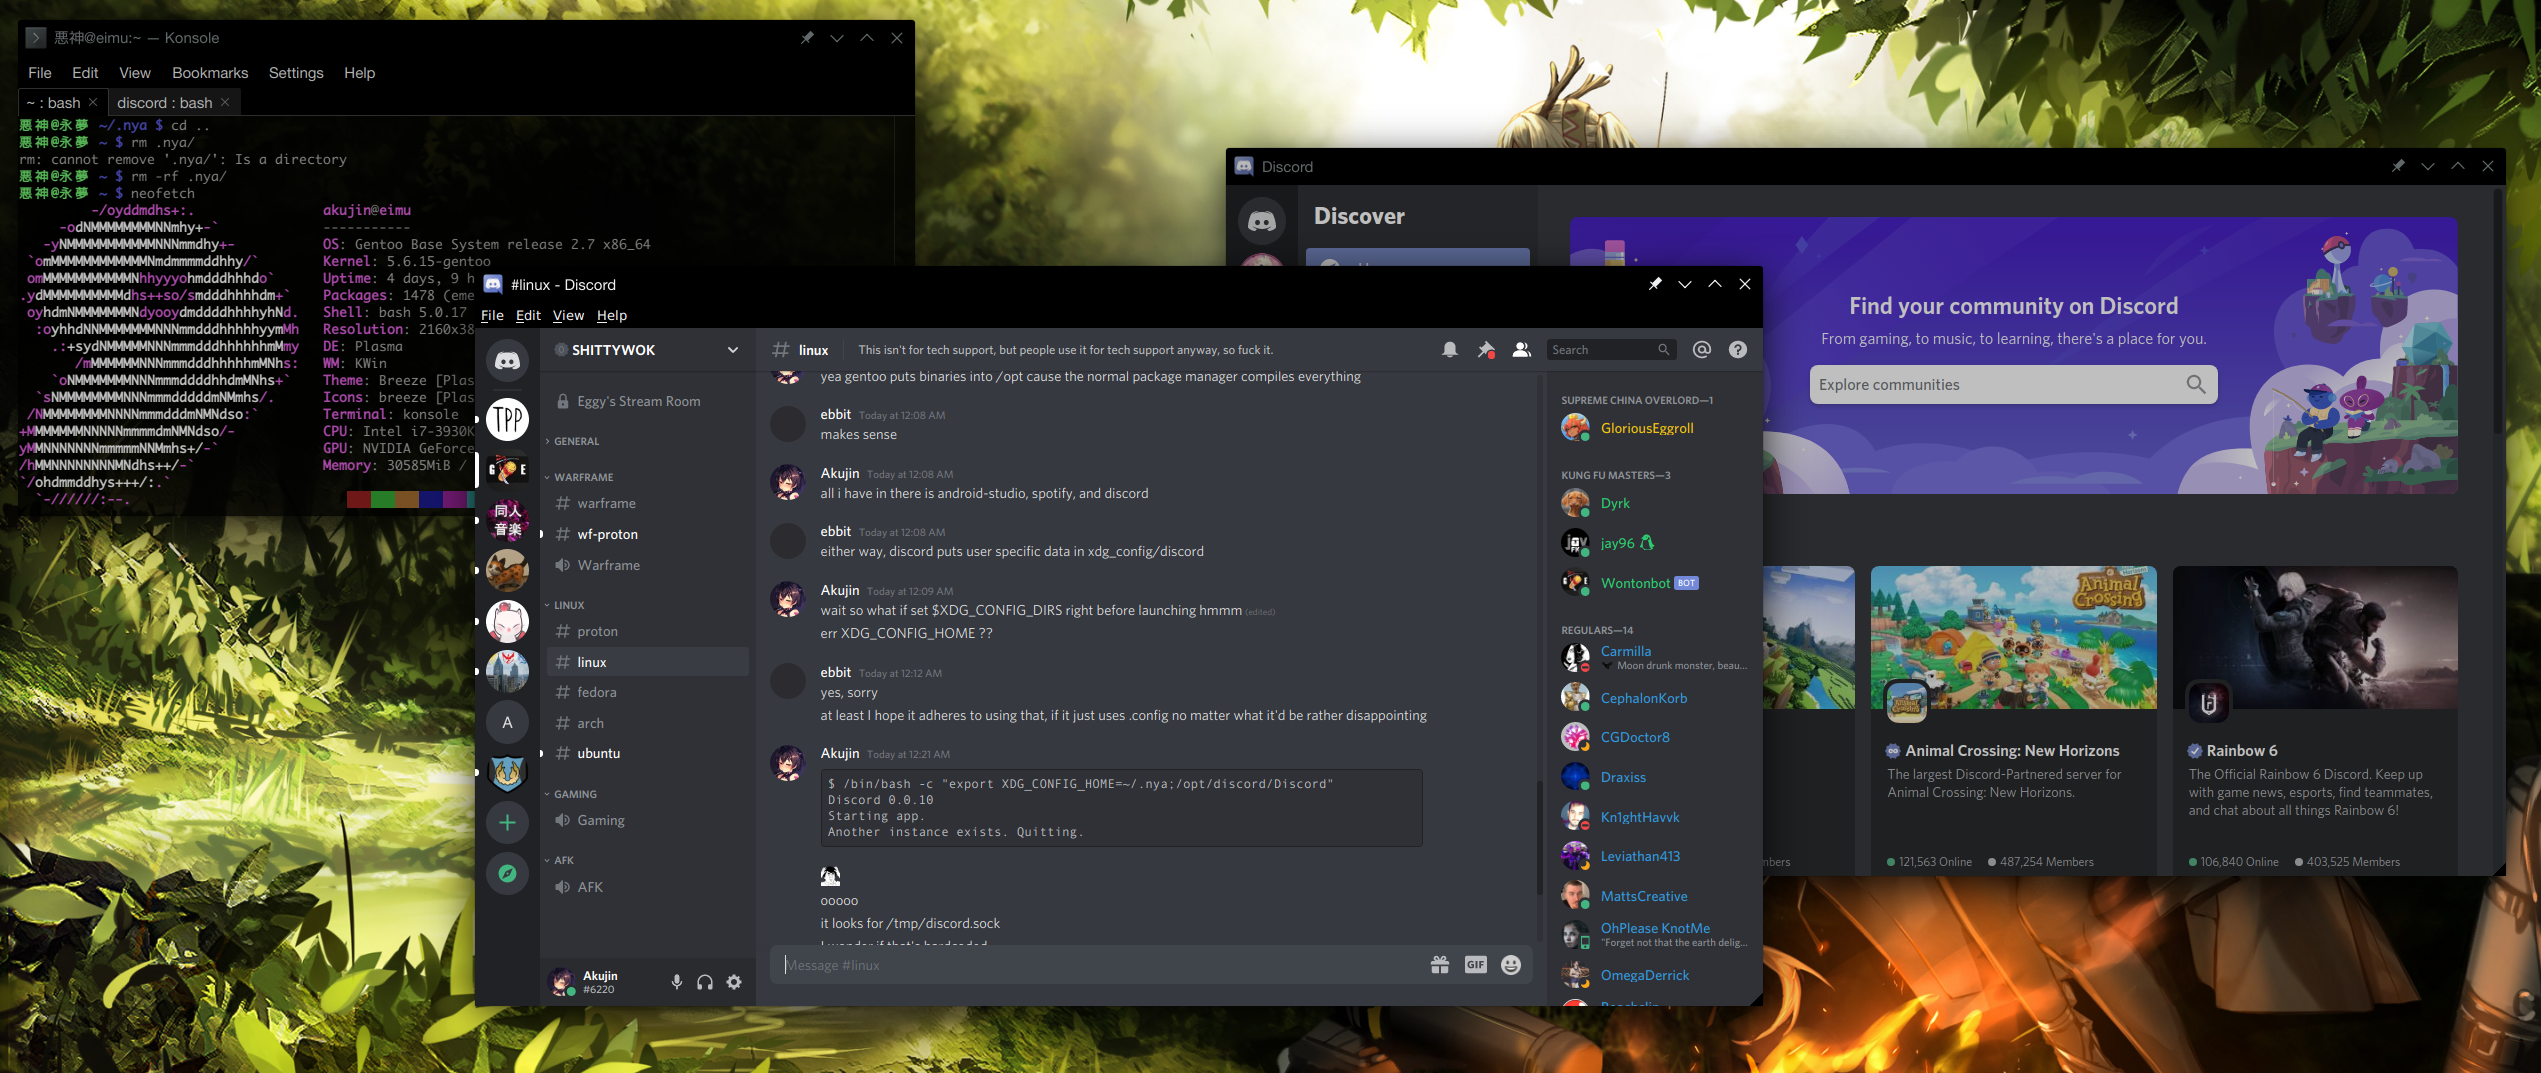
Running Multiple Instances of Discord in Linux
In Linux Discord stores it's data in XDG_CONFIG_HOME which is ~/.config by default. It also uses /tmp for a discord.sock file which it uses to determinate if there is already a running process.
Simply set both TMPDIR and XDG_CONFIG_HOME to an alternative and launch discord.
/bin/bash -c "export XDG_CONFIG_HOME=~/.nya; export TMPDIR=~/nya; /opt/discord/Discord"
In Gentoo Discord installs to /opt so change that to your location.
Solving Dependency Slot Conflicts in Gentoo Elegantly
Sometimes when you want to emerge something or upgrade something you will have dependency slot conflicts like this example.
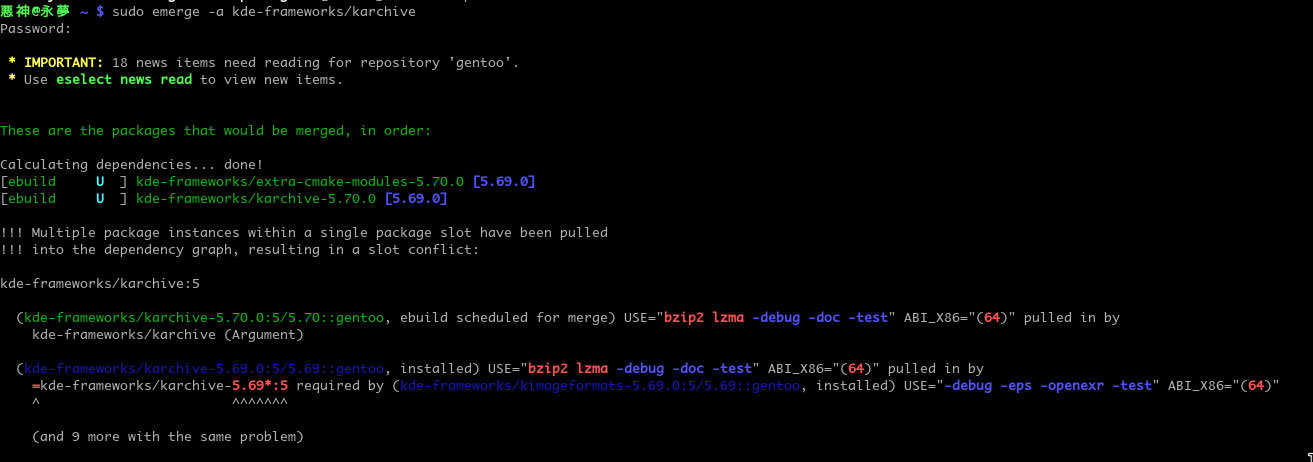
To fix this problem you'd need to emerge all kde-frameworks/* packages you currently have installed to upgrade them all at once since it's all part of one framework.
The following commands let you do so with ease.
equery l kde-frameworks/* -F '$category/$name'
The output of which you can send right into emerge like so.
sudo emerge --ask -1 --verbose-conflicts $(equery l kde-frameworks/* -F '$category/$name')
Now you'll hopefully get a clean emerge.

Age of Empires II: Definitive Edition on Linux
Get the Linux version of Steam and enable this in settings

This will unlock the ability to download and install any title even if they are Windows only titles.
Now you'll be able to enable a custom compatibility tool in the settings for the game.

I've been playing the game with Proton 5.8-GE-2-MF which you can get at https://github.com/GloriousEggroll/proton-ge-custom.
You will also need to delete these files to avoid lockups from playing wmv files in-game. Otherwise the game runs flawlessly.
rm -rf ~/.steam/steam/steamapps/common/AoE2DE/resources/_common/movies
rm -rf ~/.steam/steam/steamapps/common/AoE2DE/resources/en/campaign/movies
If you are having issues make sure you have the most recent version of DXVK, Proton, Wine and your video card's driver.
Enable Middle Mouse
In Firefox on linux middle mouse click pastes by default. To fix it set these things in about:config
middlemouse.paste: false
general.autoScroll: true
Timing things in Bash
When building Continuous Integration YAML documents I regularly need to time how long something took.
To do this we can store the current amount of $SECONDS in a variable.
last=$SECONDSWe then define a bash function
sincelast() { duration=$(( SECONDS - last )); echo \'$1\' took $duration seconds; last=$SECONDS; }To use this you simply run:
sincelast "pecl install xdebug"and that will print
'pecl install xdebug' took 16 secondsHow I gamified unit testing my PHP framework and went from 0% unit test coverage to 93% in 30 days
In 2018 I was taking a break from work. I wanted to upgrade my skills while looking for new opportunities. My previous job was working in a NodeJS environment which I certainly enjoy in many ways but PHP is actually my favorite language to work with so I wanted to challenge myself to learn something new.
I had two goals really. The first was to learn. I wanted to see what continuous integration was actually all about. The second was to prove the rock solid design of the ORM library I've been using for the past five years. It was passed around by a few local developers I knew but using it in production on new projects became an increasingly hard battle as most people wanted to use other ORMs that were more popular. It felt like without unit tests and a code coverage badge and a page on packagist I had no legitimacy. With that in mind I got to work.
With this post I hope to write down what I learned in a clear, concise, and easy to understand way for moderately experienced PHP developers and for myself.
Code Coverage
Code coverage is a line by line yes/no report from PHPUnit that simply says if that line has been tested or if it has not. You can get a code coverage report on your own computer just by running PHPUnit with XDebug enabled. Just add the command line switch --coverage-clover clover.xml when you run PHPUnit.

Here you can see I'm telling phpunit where to put the code coverage report. You will need Xdebug as well for the feature to be available. A clover.xml file by itself though is just raw data and without a proper interface to view it you won't really be able to make much use of it.
View the Code Coverage Report
One website which provides this is Codecov.io
They give you a simple to use bash install script.
You can run it right now with the report you already generated right in the terminal.

You should probably sign up at this point and claim your free private repository. If your project is open-source you can have as many as you want!
Once signed up you will find the token in the repository settings. They give you a few ways to specify the token there.

Now you can run the report uploader script from above again.

Now that it uploaded you can take a look at the report.

As you can see my initial commit had terrible code coverage. The code was still not even organized as per PSR-4 and PHP League standards but at least I had base line and there's no where to go but up.
The PHP League
The PHP League of Extraordinary Packages make a slew of excellent packages but they also provide a skeleton template available in this Git repository that documents the proper modern way of organizing a PHP project. It was invaluable to me as a reference.
It shows you how to configure badges, continuous integration, organize your source code, and lots of other best practices.
Continuous Integration
Now that we know the code coverage report works we can setup continuous integration. I'd recommend TravisCI but if you have Bitbucket premium it comes with 500 free minutes of their continuous integration solution called Pipelines. Pipelines and TravisCI are basically just plugins for Github or Bitbucket or any other host of your Git repository. They get event hooks when your code gets pushed to your Git host and then they run a bash script in a container with your code. You can then run tests, do builds, and setup other automated solutions for your source code. But how you ask? Well there's a YAML file you have to create. In this example I will show my Travis file. The source is available here.
language: php
php:
  - '7.1'
  - '7.2'

addons:
  apt:
    sources:
      - mysql-5.7-trusty
    packages:
      - mysql-server
      - mysql-client

before_install:
  #- sudo mysql -e "use mysql; update user set authentication_string=PASSWORD('divergence_tests') where User='root'; update user set plugin='mysql_native_password';FLUSH PRIVILEGES;"
  #- sudo mysql_upgrade
  #- sudo service mysql restart
  - mysql -e 'CREATE DATABASE IF NOT EXISTS test;'

install:
    # Install composer packages
  - travis_retry composer update --no-interaction --no-suggest
  - travis_retry composer install --no-interaction --no-suggest
  # Install coveralls.phar
  - wget -c -nc --retry-connrefused --tries=0 https://github.com/php-coveralls/php-coveralls/releases/download/v2.0.0/php-coveralls.phar -O coveralls.phar
  - chmod +x coveralls.phar
  - php coveralls.phar --version

before_script:
    - mkdir -p build/logs
    - ls -al

script:
  - ./vendor/bin/phpunit --coverage-clover build/logs/clover.xml

after_success:
# Submit coverage report to Coveralls servers, see .coveralls.yml
 - travis_retry php coveralls.phar -v
# Submit coverage report to codecov.io
 - bash <(curl -s https://codecov.io/bash)

 # Tell Travis CI to monitor only 'master' branch
branches:
  only: master

# Specify where the cache is so you can delete it via the travis-ci web interface
cache:
  directories:
  - vendor
  - $HOME/.cache/composer
This file basically tells Travis what to do.
- Which versions of PHP to test with.
- Which branches of the git repo to run against.
- Sets up the localhost MySQL environment for our PHPUnit tests in the container.
- Runs composer dependency installer
- Runs PHPUnit
- Uploads the code coverage report.
The best part? You get an email at the end with what got fixed or any new problems. TravisCI also runs a rudimentary static analyzer on your code bringing up problems with the source as well as your PHPDoc notation which adds even more added value to having your unit tests run automatically every time you update a given branch.
In Github you even get this view available to you all in one place.

The Road to 90%
Initially you come to the realization that your ability to increase the score through your simple and basic helper classes lets you score a few easy wins early on. Ripping out old, unused, verbose, and unclean code also lowers your total code count thereby increasing your overall coverage score. Sometimes you actually have to edit your code to make it easier to test. Standalone global code in PHP files becomes even more onerous as testing that code becomes next to impossible. Let's take a look at a few examples.
Editing your code to make it easier to test.
Here I need to fake the stream php://input which is what we parse for raw JSON data sent via POST. Doable but only by creating your own fake stream and at a different address.

But it's okay because it enabled this simple test. Which increased the coverage of that one file by 13.33%. By the way virtual streams are pretty awesome. Check out the test below.
    /**
     * @covers Divergence\Helpers\JSON::getRequestData
     */
    public function testGetRequestData()
    {
        $json = '{"array":[1,2,3],"boolean":true,"null":null,"number":123,"object":{"a":"b","c":"d","e":"f"},"string":"Hello World"}';
        vfsStream::setup('input', null, ['data' => $json]);
        JSON::$inputStream = 'vfs://input/data';

        $x = json_decode($json,true);
        $A = JSON::getRequestData();
        $B = JSON::getRequestData('object');

        $this->assertEquals($A, $x);
        $this->assertEquals($B, $x['object']);
    }
Ripping Out Old Code
Here I found a function that was previously used to manually prettify JSON used way back when PHP didn't have this functionality built in. Sometimes it's sad to delete old code. Especially when it's will written, clean, and easy to understand. But sometimes it's just time to let it go and let someone else worry about it.

Lets just say I cut a lot of random old code. This obviously had a great impact on the readability and cleanliness of the code going forward.
What I did for Database Unit Testing
Eventually I ran out of low hanging fruit testing things that had nothing to do with the database and then... it was time for the database. A number of issues came up.
- A test database would need to be created on my laptop that mirrors the TravisCI config to avoid having to write extra logic. I added a new 'testing' default config to the default database config that comes with the framework.
- I needed to add some bash terminal commands to the TravisCI file above to make it reset the database every time.
- I need a way to run some code the unit tests need to run before all the unit tests would begin to setup a bunch of fake data.
To solve this I created a class which implements PHPUnit's PHPUnit_TestListener interface. I previously wrote a post on doing this in detail.


So here we initialize our mock application and set the database connection to use the tests-mysql config.
App::setUp is actually where the mock data is created.
Fake it till you make test it
To make this database testing thing actually work I actually made a fake site that would live in the PHPUnit environment. I gave it a separate namespace in the tests namespace.

The App class from earlier? You can view it here.

As I wrote more unit tests I added more and more Tag creation stuff to this function. As I created more and more mock data attacking the more and more complex situations in my tests became easier and easier.
Lowering Code Complexity
As you get further and further into testing your code you will come to some code which has lots of complex conditional statements with multiple conditions which might potentially have any n-number of possible combinations. By breaking out your code into ever smaller and smaller methods it is possible to make every method have a very low number of combinations hopefully in the single digits.
For example the increased conditional complexity of the code below make it difficult to get tests which achieve 100% unit test coverage because you need to provide every possible permutation of conditionals and if there are more obviously there could be more conditions.

I changed the above to be a switch($options['type']) instead and broke out each type into it's own function. The new functions become much easier to test with fewer conditional permutations to keep track of.


Writing tests for these much simpler functions becomes almost trivial and the code looks much cleaner too.