From the Terminal
While humans are flying to the moon I tried to build an Earth orbital system simulation, and then an astronaut took the photo that showed the lighting I was trying to simulate
I've been building a simulation of our local orbital system with the Moon and Earth in order to make my Earth simulator more real. Check it out at http://earth.technex.us. One thing I've been playing with is the atmospheric light map.
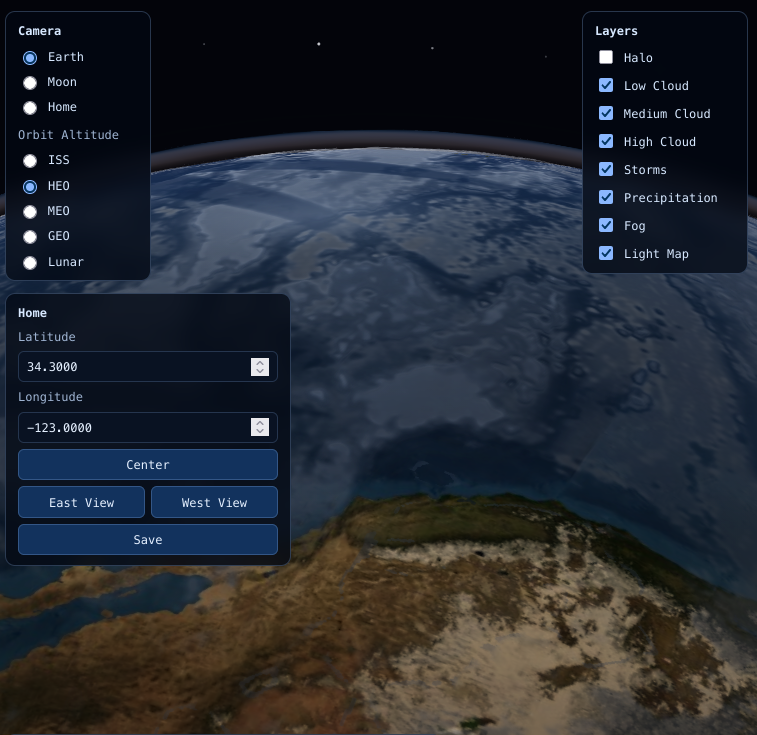
Using Earth simulations for various mundane things like wallpapers and looking at the weather is a fun way to use scientific telemetry about our planet. But it's really hard to pull all the data together in real time to make a photo realistic render of well.... our collective reality.
One of those really hard to solve problems is how light behaves when going through our atmosphere in order to simulate a photo realistic looking view of what you would actually see at the appropriate altitude. From the ISS we get very interesting photos that show these effects.

Simulating this is hard.
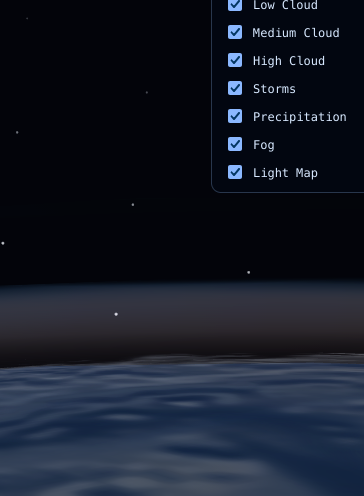
But seeing the light come through the atmosphere at much higher orbit changes the dynamics of how the light interacts even more!

This was just my first pass attempt. Others have made entire careers doing this.
It's no secret that the Artemis II launch has inspired me to do this but then NASA had this photo dropped into their inbox just hours after I started playing with this light mapping behavior.

Reid Wiseman / NASA

Which is when I got to see what it actually looks like.
I "Rewrote" My ORM Again with AI. And Ended Up Benchmarking Every PHP ORM in the Process.
You may or may not have read my other blog posts about how
How I gamified unit testing my PHP framework and went from 0% unit test coverage to 93% in 30 days
(7 years ago!) or about how
PHP attributes are so awesome I just had to add attribute based field mapping to my ORM
I've been writing ORMs by hand for 20+ years. This isn't even the only one I've worked on. ORMs for me are like puzzles so I am not kidding when I say I think about them when I'm just quietly going about my day. So with ML I've been able to basically get to where I want to be with Divergence. If you prefer blog posts written by humans I can attest that nothing in this post is written by AI and every metric presented in this post is deterministic and readily quantifiable.
Where's the benchmark result?
Here: https://the-php-bench.technex.us/runs/1
Okay so what? How is this better than other benchmarks? It's obviously vibe coded.
I hand curated a very specific architecture for how it works rather than simply that it works. Every framework has it's own vendor. Tests run in a sub process. Tests run one at a time instead of in parallel. The benchmark collects clear information about the hardware in order to provide a clear baseline. Results are logged appropriately locally and optionally uploaded to that site I put together above. Six models were hand designed in order to stress the various database types in different ways and that shows clearly in the profile of the result set.
Code Quality
I tend to go into way too much detail about my ORM that no one uses so if all you care about is the benchmark results of every other framework just look at the benchmark results above. But if you care about improving code complexity read on.
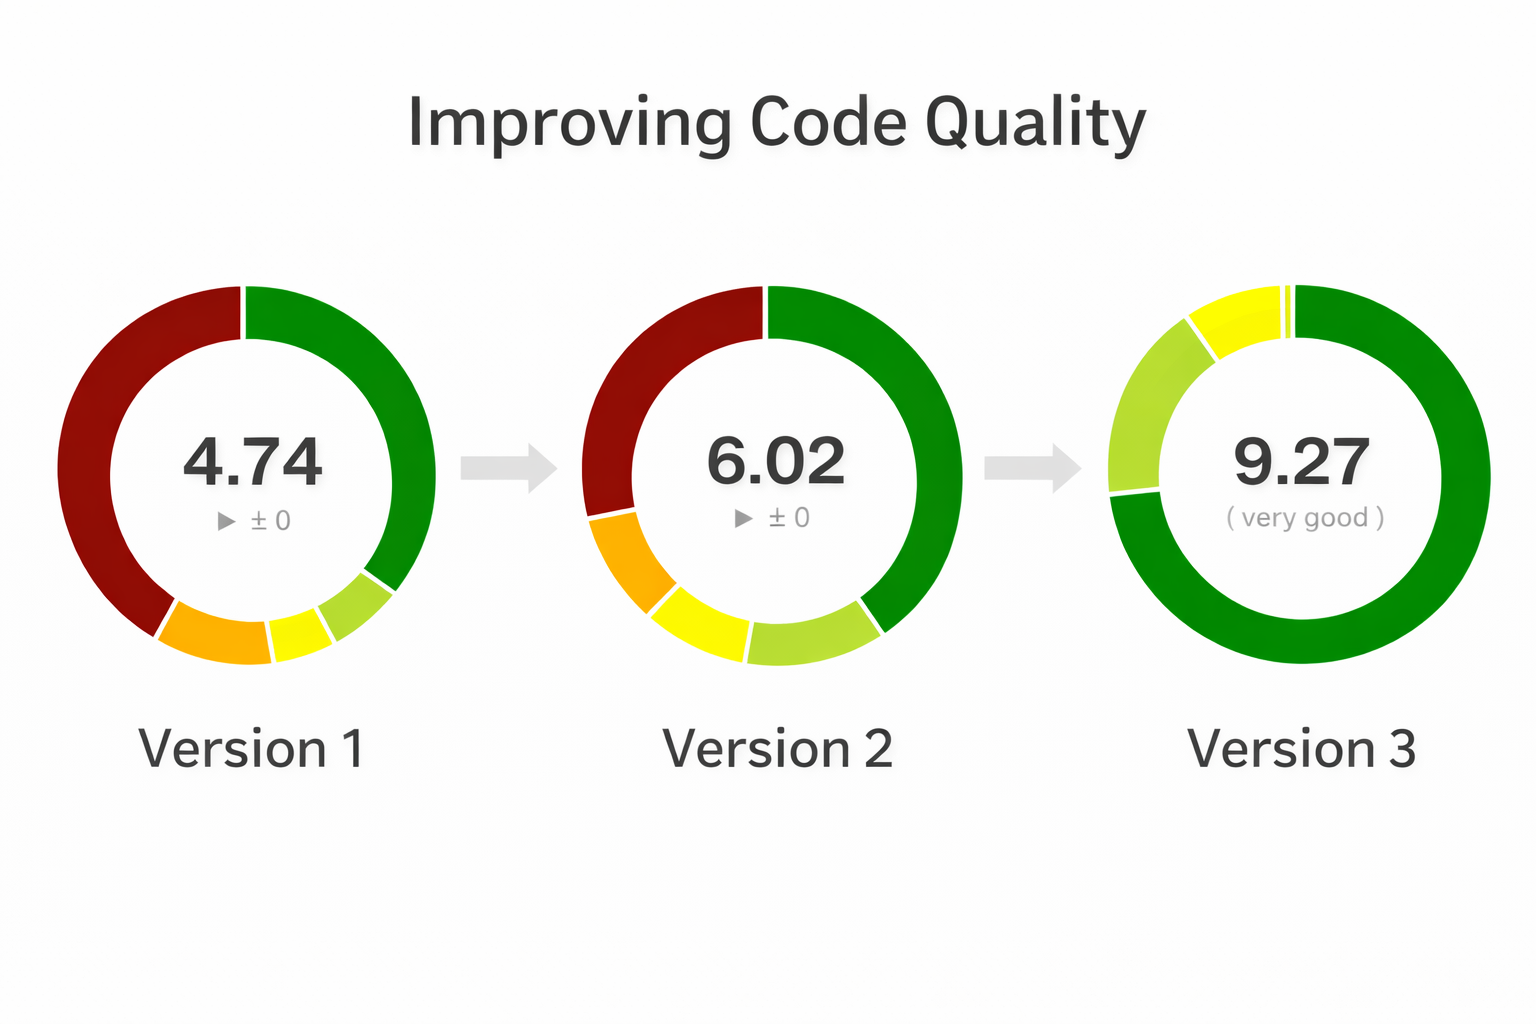
Prior to version three I had already been wanting to improve code quality and was already going in that direction.
In version three I was able to find ways to improve code quality substantially but it all built on top of the work I had done by hand moving from Version 1 to 2.
Version 1 of Divergence was mostly dominated by a large ActiveRecord monolith class paired with a MySQL class. Together they were able to stand up an impressive PHP 5.x era ActiveRecord ORM with a good track record that stood up well through PHP 7.4. PHP 8 however introduced attributes and there is where I started to think critically about Code Complexity and way of breaking up the code into smaller chunks with lower complexity.
Code Complexity? What are you talking about?
Code complexity is a measure of how many pathways your code can take. The fewer, the simpler, the easier it is to write a unit test that covers 100% of the things your function can do.
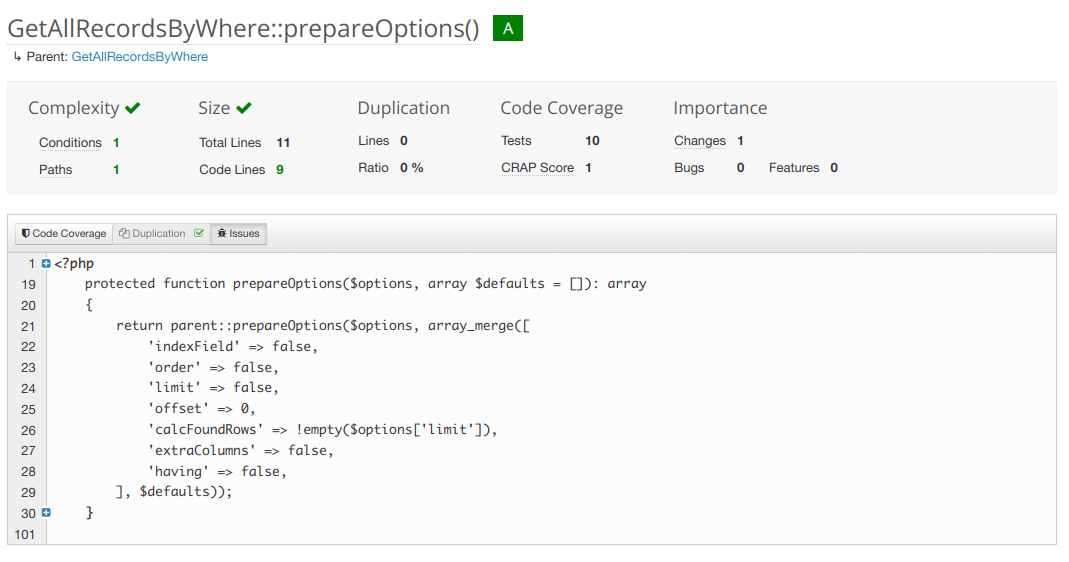
Above is a fairly simple and not very complex function.
On the other side of the fence we've got the most complex function in the framework at the moment which is my next target for refactoring.
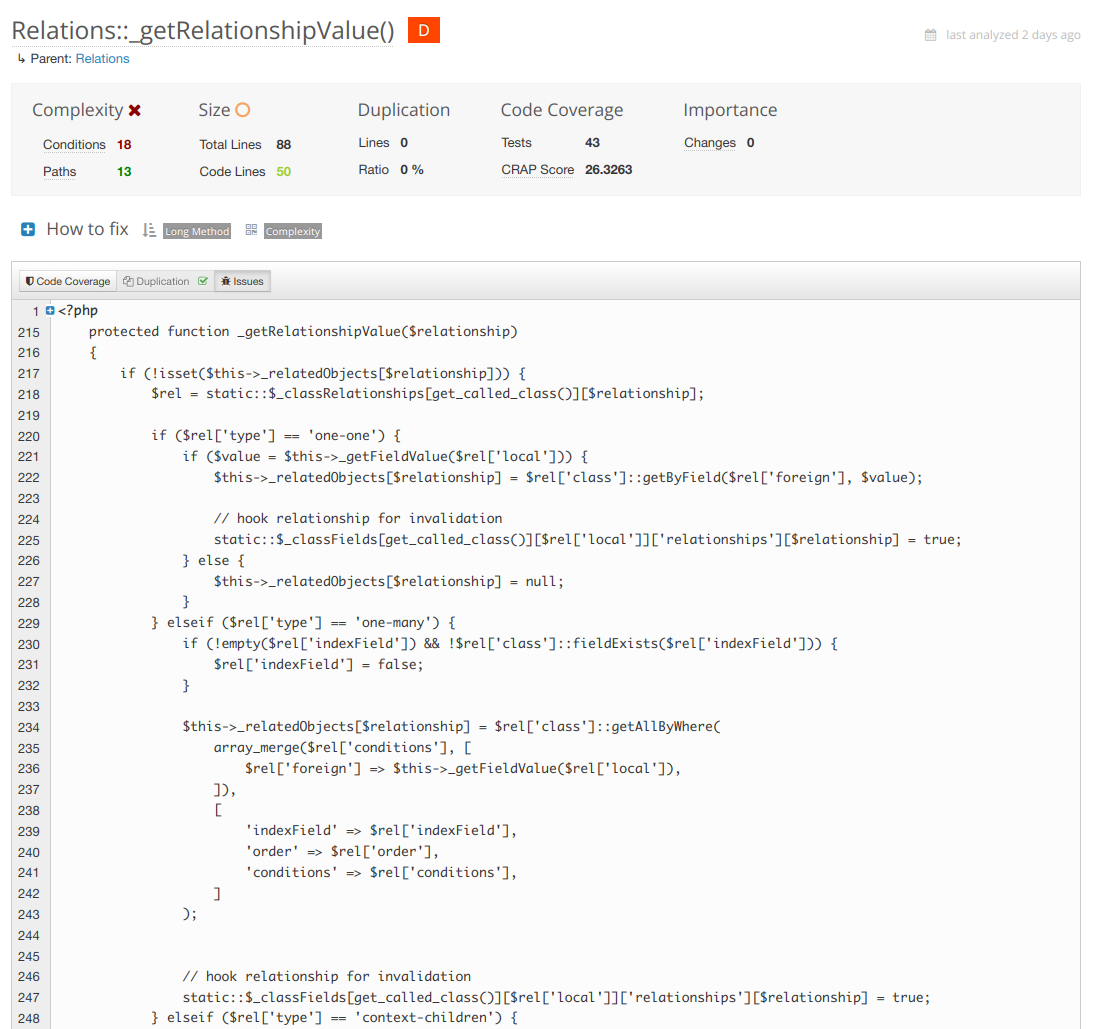
In this case the refactor is obvious. Break up each of the relationship types into smaller method calls inside the same class. Each one responsible for only it's own thing. Complexity drops. Your tests become far simpler and targeted.
Above is the worst class now... in version three. But back in version one the code was in a way worse shape with complexity.
Version 1 of Divergence - Large Monolith Classes
In 1.0 ActiveRecord was handling almost everything including mapping type values to MySQL type values so in 1.1 I introduced the "FieldSetMapper" abstraction. which allows a model to set it's own Field Mapper if necessary. A field mapper handles how types are cast between the SQL query and PHP data types. This lowered ActiveRecord's complexity in a great direction but it was still responsible for instantiating and hydrating new objects, getters, as well as the life cycle of the object. Pretty much still a monolith. Not great for code complexity.
The next thing to refactor was how queries were being written. In ActiveRecord and VersionedRecord there where only a handful of spots where a SELECT, UPDATE, INSERT, or DELETE was being generated so it was an obvious spot to start doing query writing through a class. I implemented __toString() here so all the existing string handling just keeps doing what it was doing. Tests passed no problem. At this point the ground work was laid for being able to implement other storage engines besides MySQL for the first time. This is also where I started to think of "Getters" as separate from the ActiveRecord class.
There are two types of "Getters" in ORMs. One is for getting a field, property, meta data, or relationship value internal to an object instance. The other type of "Getter" is when you want to pull records from your storage engine and have them be instantiated in your code. That second type is the one I am referring to here.
In CS-coder speak this type of Getter is essentially a factory. A place where we grab data out of the storage engine like MySQL and then shove that data into PHP objects. Getters have two parts. A query part and a hydration part. These types of Getters are broken up further into two types. Multiple records and single records. Some of them like getByWhere have a direct all version getByAllWhere. The only difference is getting one of itself to multiple of itself. So here they are. The object instantiation getters of Divergence.
| Single | Multiple |
|---|---|
getByID |
|
getByHandle |
|
getByContextObject |
getAllByContextObject |
getByContext |
getAllByContext |
getByField |
getAllByField |
getByWhere |
getAllByWhere |
getByQuery |
getAllByQuery |
getRecordByField |
|
getRecordByWhere |
getAllRecordsByWhere |
getAllByClass |
|
getAll |
|
getAllRecords |
Okay so why? Why do that?
A lot of ORMs just do this. A factory class has the getters and spits out Employee objects. Simple. Well in the best case. Something like this.
<?php
$employees = new EntityManager('Employee')->all();
In Divergence I do this:
<?php
$employees = Employee::getAll();
This has not changed since Version 1 either. From the predecessor of this framework Emergence to now this code is still valid. I'm not gonna say my changes haven't broken user space but they certainly did so in ways that are easy to port. When you have these getters registered as static methods under your class you get a global access to these models from anywhere in your code. They become singleton globals we can use anywhere.
In version 2 of Divergence I started to abstract them out by making them a trait you could attach to your Models. The default Class "Model" would automatically assign them so the global method calls persisted through the refactor and again no tests were harmed. Yet now they were not in ActiveRecord and made the code far less complex.
It became immediately apparent that every single function in the table above was either using instantiateRecord or instantiateRecords. After running the query the return data had to be converted to PHP objects and that's where it happened. So along with the above methods I was able to also move hydration into the Getters trait and a few other helper methods. They technically still accessed field and relationship mappers in the ActiveRecord class but hydration was still something we could move out of ActiveRecord as long as the mapping field mapping was calculated once. This is around the time when I wrote my blog post about attribute field maps in PHP 8.
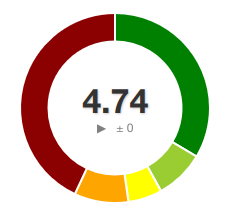
At the same time I also converted my controllers to use PSR7 and PSR15 handlers and emitters. The "old school" way is to just echo, print, and run header() whenever you please in your controller. The new way is to generate an HTTP controller object, set everything, and then pass it to an "Emitter" that does the printing and http handling. To be honest that deserves it's own blog post but suffice to say it lowered complexity further. At the same time I added Media handling classes that needed heavy refactoring. But at least for the moment I was able to take the wins and get the score from a 4.7 to a 6 with these changes. Still to hit the 9 I was looking for it would take some heavy thinking on how to tackle the next iteration. And all this was BEFORE a single AI algorithm had been used.
So in version 2 I identified these goals for version 3.
- I want to support SQLite and PostgreSQL
- To do so the Connection must be aware of it's engine and be tied to a given Model's instantiation and Hydration and the Query Writer needs to know about the Connection's Storage Engine in order to write proper syntax.
- By providing a Factory class we can keep that state with the instantiation and hydration cleanly.
- Factory classes also make it easier to test things in isolation.
- Using __call we can create different types of methods that used to live in ActiveRecord that are converted to their own classes.
- Getters that used to exist in ActiveRecord can still run statically if they are registered with the Model using __call.
- What's left after removing these things from ActiveRecord is events and those can then cleanly be moved into their own classes as well.
All this abstraction sounds like a lot but we went from ActiveRecord doing manual INSERT and UPDATE query writing hardcoded MySQL syntax. Instead now when we cast from SQL to PHP and back and the system is neatly organized and any overrides can happen in the most appropriate place. Super simple to test. The query writers for each storage engine work against whatever the active connection is and only have overrides when necessary.
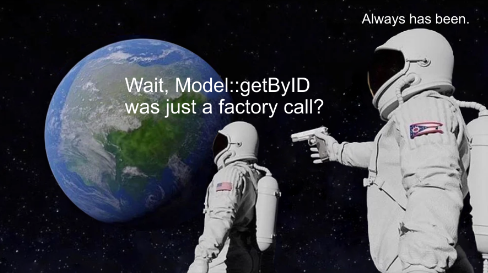
Should Models Even Have Getters and Setters to Get Records Of Themselves From the Storage Engine?
PHP is inherently procedural and owing to it's roots. Because it's procedural things are happening one at a time from beginning to end. When scaling you might have a read replica of the database that is used as a backup. In that case you might even run something like setConnection(). When your secondary connection is the same storage engine things are easy but what if it's a totally different type of SQL? That's basically why it's better to have a Factory or "Entity Manager". You might want to create two for the same Model for two different connections or more than that even. But...... 99% of projects won't ever need it. So I want to serve both schools of thought. And that is why in version 3 of Divergence I decided to introduce a Factory class for the first time. Now all the connection handling, storage engine SQL translation, mapping, and object hydration doesn't have to live in ActiveRecord. The thing is you can still use __call to build "fake" methods so I did just that for the Getters that used to live in ActiveRecord. So you can still use them and it will make you the Factory in the background but if you really need the abstraction you can also make the factories and manage them manually.
New Hydration Method
In version three besides the difference in where this stuff is happening I also abstracted out the way that objects are instantiated.
In Divergence 1 and 2 we did the classic late static binding.
Anyway here's version 3 of Divergence.
Honestly I'm not even ready to pin this version of Divergence 3 as "final". There's several new things I wanna add but well meh ship it. It's running this blog in any case and doing it quite well.
Here are my benchmarks right now
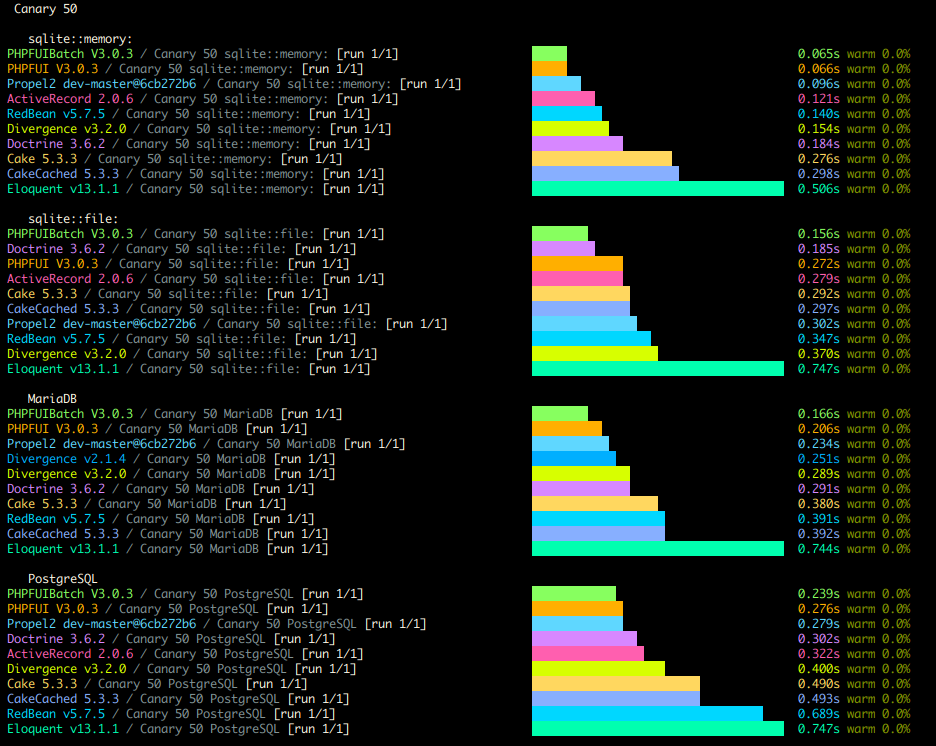
In the process of doing all this I really wanted a good profiler and test case so I ended up building a new PHP Benchmarking Suite which I call "The PHP Bench". The screenshot above is the results command doing it's thing on the CLI. But then I made a website for it where results can be viewed online.
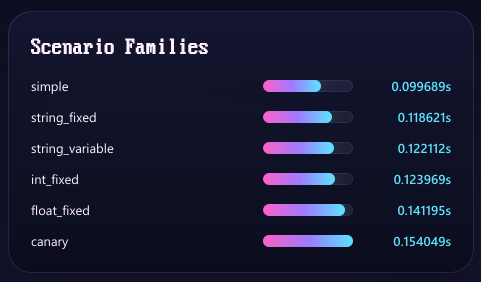
I'm particularly proud of the architecture of this benchmark. I hand designed the Models to simulate several types of data. Canary in particular handles every type of field my framework supports. But then I also have fixed ints, variable strings, and fixed strings, among other benchmarks you can run. Every type shows a clear and distinct performance profile among the various frameworks.
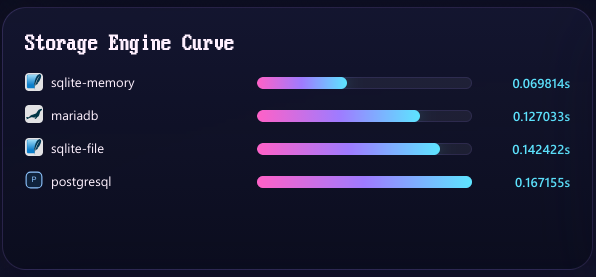
Each framework gets their own composer.json and isolated vendor path that only gets required for their individual test so none of the frameworks can really interact with each other or cause conflicts. The findings were completely unexpected to me but I'm proud to say my self made ORM is among the world's best.
Now that I have a profiler and benchmark I can use my next step is to scaffold some first to save() and some first to query profilers against some of these and see if I can shave another 0.02-0.05 ms per operation. I never really thought I'd get to hit this milestone so soon. So that's nice.
I honestly feel like a dog that finally caught the truck. Now what.

Haha just kidding. There's so much I can do with this now! With agents I can just throw the docs at it. I even got a minimal context size one written up for MVPs. I've already got this blog working of course but what's next? You can't see it but I already got my admin page slightly tricked out.
I didn't even use react. I told it to use classic jquery ajax on top of vanilla javascript so it's dead simple.
So what else is there to do? I've been wanting to tackle some federated things and see how far I can get. In particular I think it would be fun to turn this blog into a federated node and implement the ActivityPub protocol.
Stuff You Can Play With
keyd on Gentoo with OpenRC and KDE Plasma
git clone https://github.com/rvaiya/keyd
cd keyd
make && sudo make install
touch /etc/init.d/keyd
nano /etc/init.d/keyd
Pop this in there and save.
#!/sbin/openrc-run

# Description of the service
description="keyd key remapping daemon"

# The location of the keyd binary
command="/usr/local/bin/keyd"
#command_args="-d"
pidfile="/run/keyd.pid"

depend() {
    need localmount
    after bootmisc
}

start() {
    ebegin "Starting keyd"
    start-stop-daemon --start --exec $command --background --user root  --make-pidfile --pidfile $pidfile --
    eend $?
}

stop() {
    ebegin "Stopping keyd"
    start-stop-daemon --stop --pidfile $pidfile
    eend $?
}

restart() {
    ebegin "Restarting keyd"
    start
    eend $?
}
sudo rc-update add keyd default
/etc/init.d/keyd start
sudo setfacl -m u:USERNAME:rw /var/run/keyd.socket
If you want application specific key binds you need to run /usr/local/bin/keyd-application-mapper inside your KDE Plasma session. To do that simply add it to your autostart through the System Settings application.

Port forwarding a database through a VPN with Docker and Nginx
This goes into your docker-compose.yml
version: '3.9'

services:
  openvpn-client:
    image: ghcr.io/wfg/openvpn-client
    container_name: openvpn-client
    cap_add:
      - NET_ADMIN
    devices:
      - /dev/net/tun
    volumes:
      - ./.docker/openvpn:/config # place config.ovpn file into this folder
    #network_mode: container:openvpn-client
    #restart: unless-stopped
    environment:
      - CONFIG_FILE=config.ovpn
      - ALLOWED_SUBNETS=192.168.0.0/24,192.168.1.0/24
    #  - AUTH_SECRET=credentials.txt
    networks:
      front-tier:
        ipv4_address: 172.25.0.7
  proxy:
    image: nginx:1.25.1
    container_name: db-proxy
    network_mode: container:openvpn-client
    volumes:
    - ./.docker/proxy/nginx/:/etc/nginx/
    - ./.docker/proxy/logs/:/var/log/nginx/
    depends_on:
      - openvpn-client

networks:
  front-tier:
    ipam:
      driver: default
      config:
        - subnet: "172.25.0.0/24"
Make sure to create the folders .docker/proxy/nginx/ and .docker/proxy/logs/.
Place this into .docker/proxy/nginx/nginx.conf
user  nginx;
worker_processes  auto;

error_log  /var/log/nginx/error.log notice;
pid        /var/run/nginx.pid;

events {
    worker_connections  1024;
}

http {
    # This is where all http server configs go.
}

stream {
    server {
      listen 5432;

      proxy_connect_timeout 60s;
      proxy_socket_keepalive on;
      proxy_pass 10.0.3.11:5432;
    }
}
Just make sure to set proxy_pass to the destination.
After running docker-compose up you'll be good to go.
Configuring an RTMP streaming server for VRChat with Nginx
I recently picked up a Valve Index and I've started to explore the music community
One of the most compelling aspects of VRChat as a platform is how you can use it as a way of discovering music. A vast and diverse community of individuals with varied musical tastes and backgrounds already exists. In VRChat, you can attend music festivals, explore custom-built music worlds, and interact with other users who share your passion for various musical genres. This environment encourages discovery and exposes you to a wide range of genres, artists, and tracks that you may not have encountered otherwise. It's a melting pot of musical creativity waiting to be explored.
Moreover, VRChat offers a unique opportunity for musicians, DJs, and producers to hone their craft and experiment with performing, mixing, and DJing in a virtual setting. Through the integration of streaming music into VRChat, you can curate and share playlists, perform live DJ sets, and even create your own virtual music venues. The interactive nature of VRChat enables you to receive immediate feedback from your audience, allowing you to refine your skills, experiment with new techniques, and build a dedicated following.
While Twitch and YouTube have transformed the streaming landscape, they do have limitations that can impact the quality and control of your stream. These platforms often inject ads into your content, disrupting viewer engagement, and they impose restrictions on bitrate, limiting the stream's video quality. To overcome these challenges, many streamers are turning to Nginx for RTMP. By configuring Nginx to stream directly to your audience, you regain control over your stream, eliminate unwanted ads, and achieve higher bitrates for an uninterrupted, high-quality viewing experience.
This reference should let you quickly set up a public facing site.
nano /etc/nginx/sites-enabled/stream.conf server {
listen 443 ssl;
server_name stream.yourdomain.example;
ssl_certificate /etc/letsencrypt/live/stream.yourdomain.example/fullchain.pem; # managed by Certbot
ssl_certificate_key /etc/letsencrypt/live/stream.yourdomain.example/privkey.pem; # managed by Certbot
include sites-available/include-ssl.conf;
server_tokens off;
# rtmp stat
location /stat {
rtmp_stat all;
rtmp_stat_stylesheet stat.xsl;
}
location /stat.xsl {
root /var/www/stream/rtmp;
}
# rtmp control
location /control {
rtmp_control all;
}
location /hls {
# Serve HLS fragments
types {
application/vnd.apple.mpegurl m3u8;
video/mp2t ts;
}
root /tmp;
add_header Cache-Control no-cache;
add_header 'Access-Control-Allow-Origin' '*' always;
add_header 'Access-Control-Expose-Headers' 'Content-Length';
if ($request_method = 'OPTIONS') {
add_header 'Access-Control-Allow-Origin' '*';
add_header 'Access-Control-Max-Age' 1728000;
add_header 'Content-Type' 'text/plain charset=UTF-8';
add_header 'Content-Length' 0;
return 204;
}
}
}
Make sure to add this global rtmp config.
sudo nano /etc/nginx/rtmp.confrtmp {
server {
listen 1935; # this is the port, you may change it if necessary.
chunk_size 4096;
application live { # "live" may be changed to whatever you'd like, this will affect the URLs we use later, though.
live on;
allow publish 0.0.0.0; # put your IP here.
deny publish all; # denied if none of the above apply.
# -- HLS --
hls on;
hls_path /tmp/hls; # this is where all of HLS's files will be stored.
# They are a running replacement so disk space will be minimal.
# Adjust other HLS settings if necessary to level it out if it's a problem.
hls_playlist_length 60s;
hls_fragment 1s;
# optionally,
hls_continuous on;
}
}
}
Add this to the bottom of /etc/nginx/nginx.conf
include rtmp.conf;The URL will actually be rtmp://stream.yourdomain.example/live/random-stream-key but in OBS we will actually put in rtmp://stream.yourdomain.example/live and the second field in OBS is our key.

Finally the stream link we will put into VRC will look like this.
https://stream.yourdomain.example/live/random-stream-key.m3u8
PHP attributes are so awesome I just had to add attribute based field mapping to my ORM
I wrote this post to talk about the architectural decisions I had to make in upgrading my ORM recently to PHP8 as well as the general justification for using an ORM in the first place as a query writer, runner, and object factory and why I consider attributes to be the holy grail of ORM field mapping in PHP.
Writing Queries
I've always been fascinated with moving data in and out of a database. I've been at this from PHP4 days, you know. As hard as it is to believe even back then we had a testable, repeatable, and accurate way of pushing data into and out of a database. I quickly found myself writing query after query.... manually. At the time there was no off the shelve framework you could just composer require. So I found myself thinking about this problem again and again and again and again.
Put simply when you write SQL queries you are mapping variable values in memory to a string. If you are one of those people that claims that an ORM is bloat you'll find yourself writing hundreds of queries all over your projects.
If you've ever imploded an array by a "','" but then ended up doing it in dozens or hundreds or thousands of places the next logical step is to stop rewriting your code and write a library.... and hence an ORM is born. An ORM is an absolute statement; that "I will not rewrite code for handling a datetime" and then actually following through.
To make this happen you must write some sort of translation layer from PHP types to SQL types. In most ORMs this is called mapping.
Before PHP8 the typical thing to do was to use a PHP array defined statically containing all that information. Like this. In fact this is from Divergence from before version 2.
    public static $fields = [
        'ID' => [
            'type' => 'integer',
            'autoincrement' => true,
            'unsigned' => true,
        ],
        'Class' => [
            'type' => 'enum',
            'notnull' => true,
            'values' => [],
        ],
        'Created' => [
            'type' => 'timestamp',
            'default' => 'CURRENT_TIMESTAMP',
        ],
        'CreatorID' => [
            'type' => 'integer',
            'notnull' => false,
        ],
    ];
But this kinda sucks. There's no way to do any auto complete and it's just generally a little bit slower.
A few frameworks decided to support mapping using annotations (an extended PHPDoc in PHP comments) and even yaml field maps but those are all just bandaids on the real problem. Which was that there was no real way to provide proper field definitions using the raw language's tokens, instead relying on the runtime to store and process that information.
Attributes
So that's my long winded explanation about why my absolute favorite feature of PHP 8 is attributes. Specifically for ORM field mapping. Yea really.
    #[Column(type: "integer", primary:true, autoincrement:true, unsigned:true)]
    protected $ID;

    #[Column(type: "enum", notnull:true, values:[])]
    protected $Class;

    #[Column(type: "timestamp", default:'CURRENT_TIMESTAMP')]
    protected $Created;

    #[Column(type: "integer", notnull:false)]
    protected $CreatorID;
This is sooooo much cleaner. Look how awesome it is. Suddenly I have auto complete for field column definitions right in my IDE!

Now the code is cleaner and easier to follow! You've even got the ability to type hint all your fields.
Once we take field mapping to it's logical conclusion it becomes practical to simply map as many database types as we can into the ORM. We can even try to support all of the various field types that could be used in SQL and represented somehow in PHP. Of course to make this happen it becomes necessary to tell the framework some details about the database field type you decide to use. For example you can easily see yourself using a string variable type for varchar, char, text, smalltext, blob, etc but most ORMs aren't typically smart enough to warn you when you inevitably make a mistake and try to save your larger than 256 character string to a varchar(255). If you were to build all of this yourself you would invariably find yourself creating your own types for your ORM and doing a translation from language primitive to database type and back just like I am here. This gets even more complex when an ORM decides to support multiple database engines. Once this becomes more fleshed out you can even have your ORM write the schema query and automatically create your tables from your code.
Here for example I'm gonna go ahead and create a Tag class and then save something.
class Tag extends Model {
    public static $tableName = 'tags';
    protected $Tag; // this will be a varchar(255) in MySQL, a string in PHP
}

$myTag = new Tag();
$myTag->Tag = 'my tag';
$myTag->save();
With these few simple lines of code we've created a tags table and saved a new Tag "my tag" into our new table. The framework automatically detected the table was missing during the save and created it and then followed through by running the original save. Excellent for bootstrapping new projects or installing software.
Protected? Magic Methods
Traditionally it's common to think that __get and __set are triggered only when a property is undefined. However it is also triggered if you try to access a protected property from outside of the model. When you access a protected attribute from outside of the object it will always trigger __get when retrieving and __set when setting. For this reason I decided to use protected attributes in a Model for mapping.
The way in and out allows us to do some type casting. For example Divergence supports reading a timestamp in Y-m-d H:i:s, unix timestamp, and if it's a string that isn't Y-m-d H:i:s it will try running it through strtotime() before giving up. But that will only ever happen when __set is called thereby starting the chain of events leading to the necessary type casting for that field type. Unfortunately the downside to using a protected in this context is that when you need to access a field inside the object you can't use $this->Tag = 'mytag'; because it won't trigger __set and so what's gonna happen is you will end up messing with the internal data of that field incorrectly. So for the specific context where you're working with the field directly inside of the object itself you should actually use setValue and getValue instead. Frankly you can use __set and __get directly but let's be civilized here. This caveat is why I would like to see the ability for PHP to have __set and __get triggerables configurable to do so on existing object members.
Relationships.
But wait. There's more! Now with the ability to use Attributes for field definitions we can use them for relationship definitions as well.
    #[Relation(
        type: 'one-one',
        class: User::class,
        local: 'CreatorID',
        foreign: 'ID'
    )]
    protected $Creator;

    #[Relation(
        type: 'one-many',
        class: PostTags::class,
        local: 'ID',
        foreign: 'BlogPostID'
    )]
    protected $Tags;
Relationships take Attributes to the next level.
$this->getValue('Tags');This is all you need to pull all the Tags as an array. Most relationship types can be easily expressed in this format.
$Model->Tags // also works but only from "outside"You can run it like this as well from outside of the Model.
PHP in 2023 is blindingly fast.
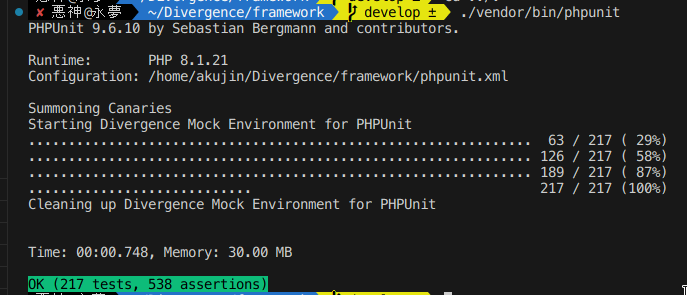
Today the entire suite of tests written for Divergence covering 82% of the code completes in under a second. Some of these tests are generating thumbnails and random byte strings for mock data.
For reference in 2019 the same test suite clocked in at 8.98 seconds for only 196 tests. By the way these are database tests including dropping the database and creating new tables with data from scratch. The data is randomized on every run.
Performance
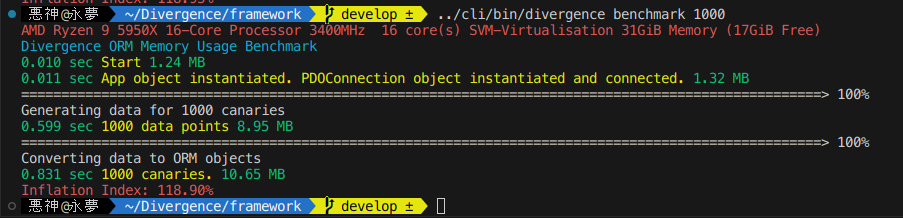
What you are seeing is [time since start] [label] [memory usage] at print time.
The first part where it generates 1000 data points is all using math random functions to generate random data entirely in raw none-framework PHP code. Each Canary has 17 fields meant to simulate every field type available to you in the ORM. Generating all 17 1000 times takes a none trivial amount of time and later when creating objects from this data it must again process 17,000 data points.
Optimizing the memory usage here will be a point of concern for me in future versions of the ORM.
All the work related to what I wrote about in this post is currently powering this blog and is available on Github and Packagist.
Bunny Post
This bunny video brought to you by this code.
How to give a Chromium based browser an isolated custom icon for a seperate profile in Linux
Create a new desktop icon in ~/.local/share/applications.
Use this as a template
[Desktop Action new-private-window]
Exec=chromium-browser --incognito
Name=New Incognito Window

[Desktop Action new-window]
Exec=chromium-browser
Name=New Window

[Desktop Entry]
Actions=new-window;new-private-window;
Categories=Network;WebBrowser;
Comment[en_US]=Access the Internet
Comment=Access the Internet
Exec=chromium-browser --user-data-dir=/home/akujin/.config/chromium-ihub/ --app-id=iHubChromium --class=iHubChromium && xdotool search --sync --classname iHubChromium set_window --class iHubChromium
GenericName[en_US]=Web Browser
GenericName=Web Browser
Icon=/home/akujin/iHub/logo-square.png
MimeType=text/html;image/webp;image/png;image/jpeg;image/gif;application/xml;application/xml;application/xhtml+xml;application/rss+xml;application/rdf+xml;application/pdf;
Name[en_US]=Chromium iHub
Name=Chromium iHub
Path=
StartupNotify=true
StartupWMClass=iHubChromium
Terminal=false
TerminalOptions=
Type=Application
Version=1.0
X-DBUS-ServiceName=
X-DBUS-StartupType=
X-KDE-SubstituteUID=false
X-KDE-Username=
Run update-desktop-database ~/.local/share/applications after any changes to the desktop file.
And there you have it. A custom icon.

Gyudon (Japanese Beef Rice Bowl) 牛丼
Gyudon Sauce for 1/2 lb of rib eye
- ½ cup dashi (Japanese soup stock) - if using Handashi (dry dashi), stir 1/4 tsp in 1/2 cup of hot water
- 1 Tbsp sugar (adjust according to your preference)
- 2 Tbsp sake (substitute with dry sherry or Chinese rice wine; for a non-alcoholic version, use water)
- 2 Tbsp mirin (substitute with 2 Tbsp sake/water + 2 tsp sugar)
- 3 Tbsp soy sauce

Gyudon
- 1/2 lb of ribeye thinly sliced
- A white onion approx 2.5 to 3 inches in diameter, cut thinly into half circles
- Japanese style white rice
- Raw egg

Optional Garnishes
- Seseme seeds
- Green onion
- Grated garlic
- Pickled ginger
- Red pepper
Instructions
Prepare the gyudon sauce by mixing all the ingrediants listed. Put the gyudon sauce into a pan with a lid and allow it to heat up enough that it has started to show a mist from evaporation. Place the onion into the sauce and spread around to allow most of the onion to be touching the pan. Cover with lid and let cook until the onions are soft. Stir a few times. Add the meat by laying out each slice and flipping after a minute or so. Stack to the side as it becomes ready and add more. When all the meat is done stir.
Prepare the bowls by heating them up in the oven at 200 as an optional step. Lay the rice into the bowl with a dip in the center. Lay out the meat and onions over the rice to the outside of the dip. Pop a raw egg over the dip. Add green onion, red pepper, sesame seeds, and grated garlic to taste. Serve quickly & stir quickly so the raw egg is cooked by the rice.
V4L2 Notes for Linux
Find out what is using capture devices
fuser /dev/video0Find out name of process
ps axl | grep ${PID}Show info
v4l2-ctl --allSet resolution and frame rate
v4l2-ctl -v width=1920,height=1080 --set-parm=60
v4l2-ctl -v width=3840,height=2160 --set-parm=30
Reset USB Device
usbreset "Live Streaming USB Device"Show Stream in GUI
qvidcapCreate a virtual video capture device
sudo modprobe v4l2loopback devices=1 video_nr=10 card_label="OBS Cam" exclusive_caps=1Automatically on Kernel Start up
Must install https://github.com/umlaeute/v4l2loopback
media-video/v4l2loopback on Gentoo
echo "v4l2loopback" > /etc/modules-load.d/v4l2loopback
echo "options v4l2loopback devices=1 video_nr=10 card_label=\"OBS Cam\" exclusive_caps=1" > /etc/modprobe.d/v4l2.conf
Run modprobe v4l2loopback after setting it up to load without restarting.