From the Terminal
Installing XDebug on anything for VSCode in 5 minutes (XDebug 2.x)
Update 2/25/2021: This guide is for XDebug 2.x only.
I see a lot of over complicated guides on XDebug so I'll simplify things real quick for everyone.
Visual Studio Code has debugging support out of the box. Click on the Debug icon in the left bar (OS X: ⇧⌘D, Windows / Linux: CTRL+SHIFT+D) then click on the cog icon which should open your launch.json file or create one if none exists.
You must have the PHP XDebug extension installed of course.

Now add this to your launch.json file you have open:
        {
            "type": "php",
            "request": "launch",
            "name": "Listen For XDebug",
            "port": 9000,
            "pathMappings": {
                "/var/www/": "${workspaceRoot}"
            },
            "xdebugSettings": {
                "max_children": 256,
                "max_data": -1,
                "max_depth": 5
            },
            "ignore": [
                "**/vendor/**/*.php"
            ]
        }
Make sure you change /var/www/ to where your code is on your local server.
Set this in your php.ini
[xdebug]
xdebug.remote_enable = 1
xdebug.remote_autostart = 1
xdebug.profiler_enable_trigger = 1
You might need to do it twice. Once for CLI and once for PHP-FPM!
Typical locations for your php.ini file:
- Linux: /etc/php/{$version}/php.ini
- macOS (Homebrew): /usr/local/etc/php/{$version}/php.ini
Don't forget to restart php-fpm!
Now start the debugger by hitting the green play button.
Infinity
I always think about how if you count from one to infinity; within that infinity of numbers exists every movie, book, photograph, software or game, video, song or sound, work of art, insignificant doodle, and master piece of conscious thought in every file format you can image and yet to be invented and never to be invented.
All of that is in this simple loop
i=1;while(i) { i++; }
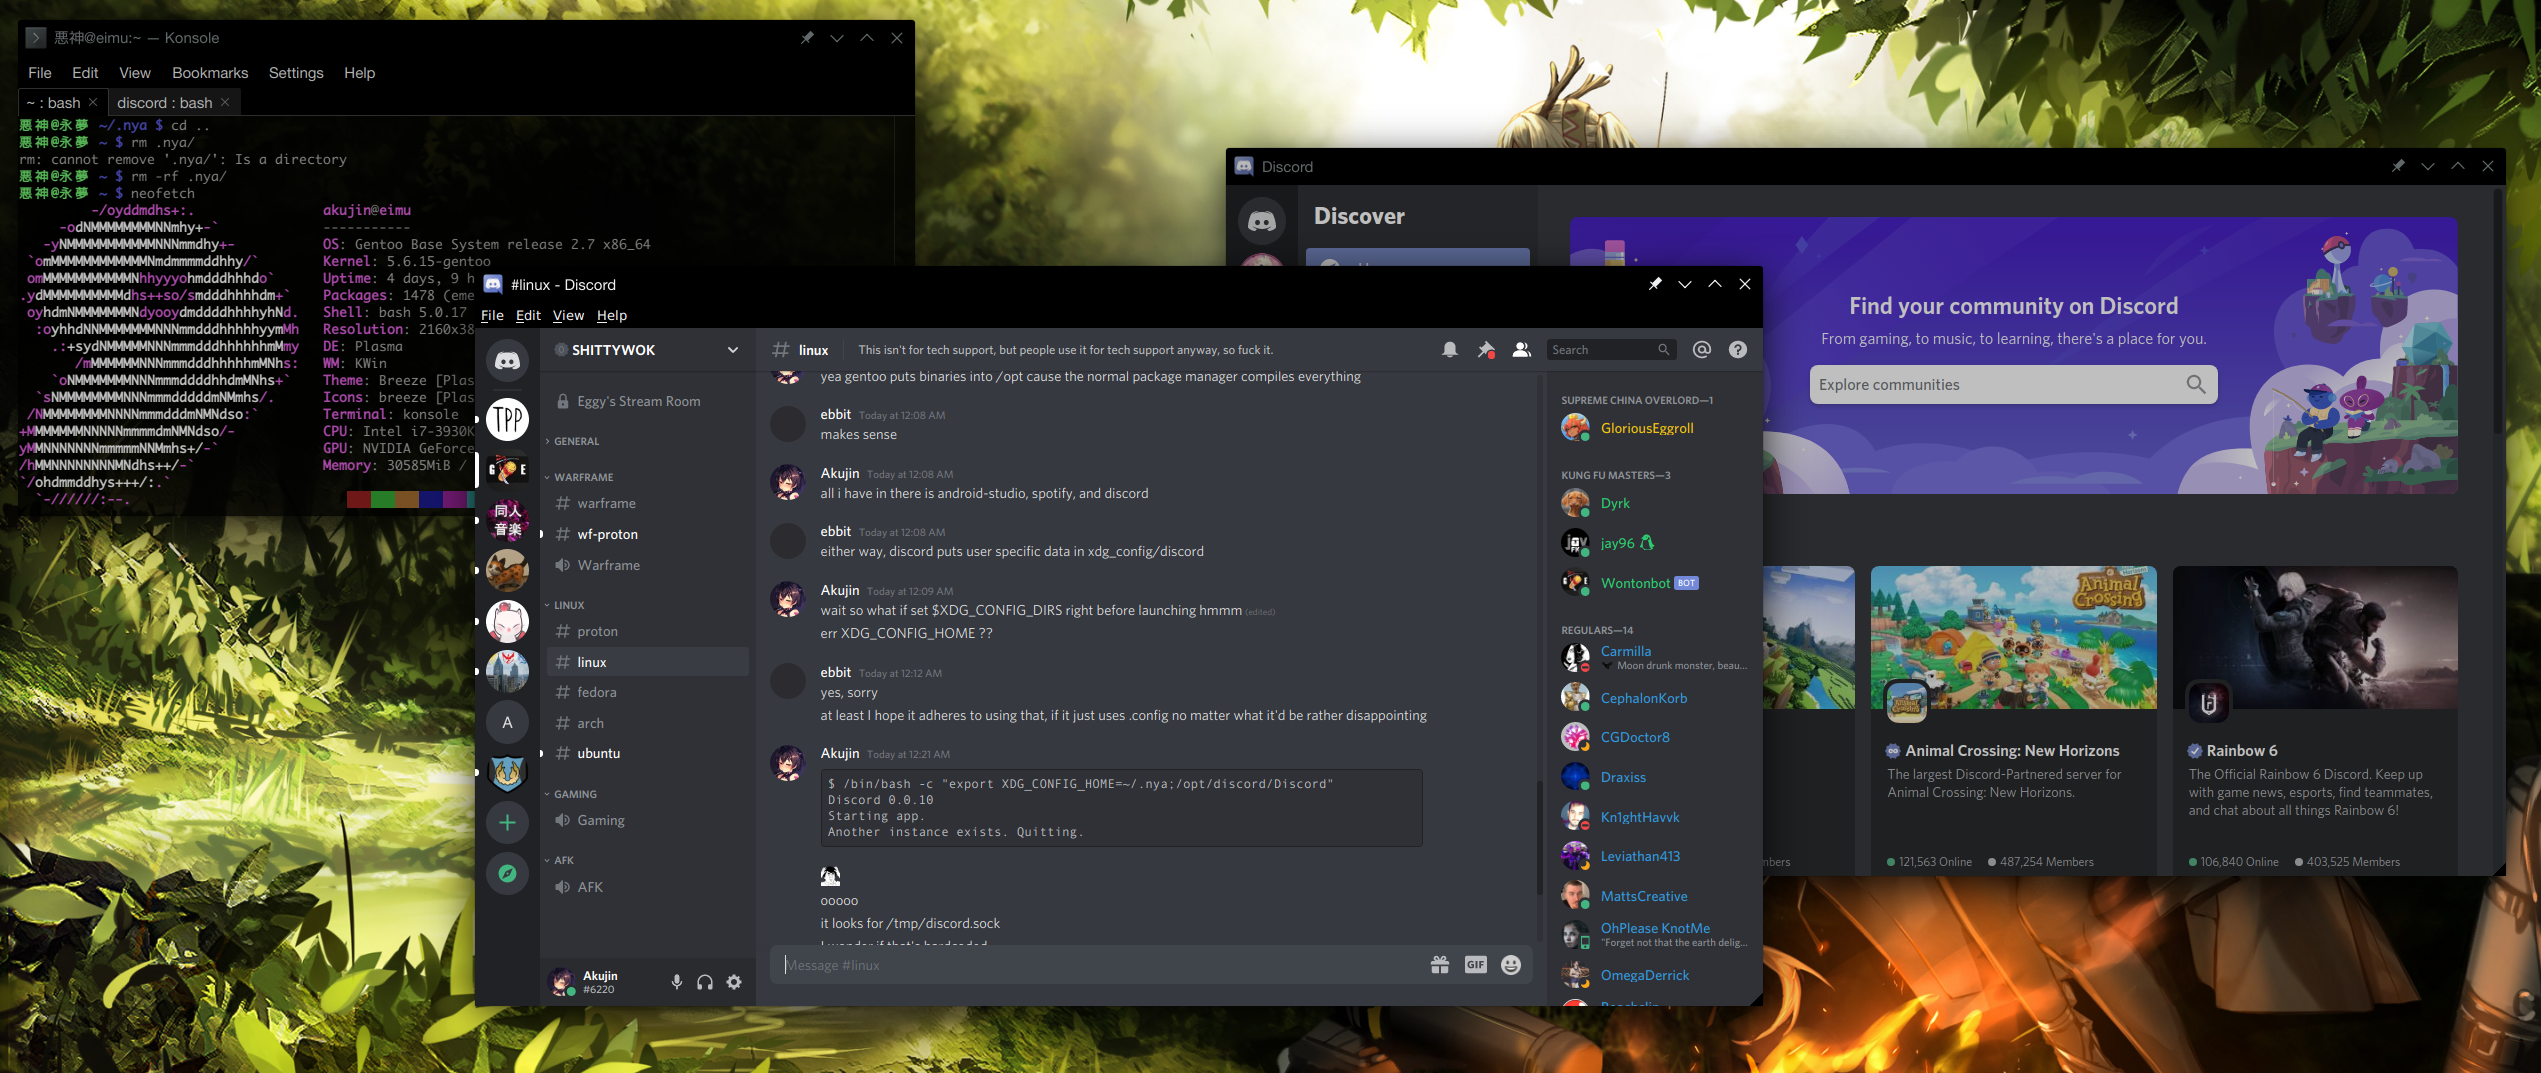
Running Multiple Instances of Discord in Linux
In Linux Discord stores it's data in XDG_CONFIG_HOME which is ~/.config by default. It also uses /tmp for a discord.sock file which it uses to determinate if there is already a running process.
Simply set both TMPDIR and XDG_CONFIG_HOME to an alternative and launch discord.
/bin/bash -c "export XDG_CONFIG_HOME=~/.nya; export TMPDIR=~/nya; /opt/discord/Discord"
In Gentoo Discord installs to /opt so change that to your location.
Solving Dependency Slot Conflicts in Gentoo Elegantly
Sometimes when you want to emerge something or upgrade something you will have dependency slot conflicts like this example.
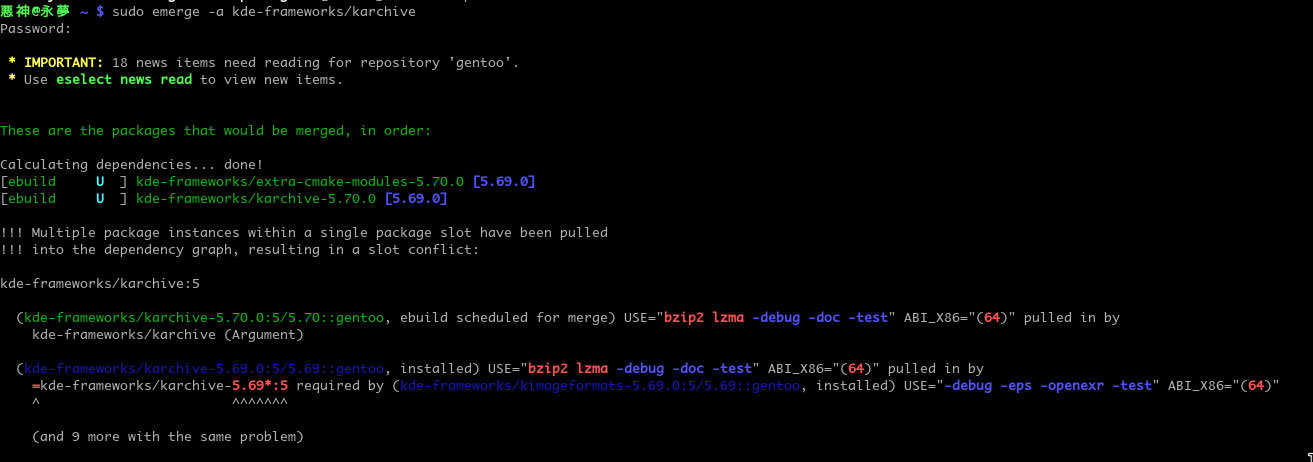
To fix this problem you'd need to emerge all kde-frameworks/* packages you currently have installed to upgrade them all at once since it's all part of one framework.
The following commands let you do so with ease.
equery l kde-frameworks/* -F '$category/$name'
The output of which you can send right into emerge like so.
sudo emerge --ask -1 --verbose-conflicts $(equery l kde-frameworks/* -F '$category/$name')
Now you'll hopefully get a clean emerge.

Age of Empires II: Definitive Edition on Linux
Get the Linux version of Steam and enable this in settings

This will unlock the ability to download and install any title even if they are Windows only titles.
Now you'll be able to enable a custom compatibility tool in the settings for the game.

I've been playing the game with Proton 5.8-GE-2-MF which you can get at https://github.com/GloriousEggroll/proton-ge-custom.
You will also need to delete these files to avoid lockups from playing wmv files in-game. Otherwise the game runs flawlessly.
rm -rf ~/.steam/steam/steamapps/common/AoE2DE/resources/_common/movies
rm -rf ~/.steam/steam/steamapps/common/AoE2DE/resources/en/campaign/movies
If you are having issues make sure you have the most recent version of DXVK, Proton, Wine and your video card's driver.
Enable Middle Mouse
In Firefox on linux middle mouse click pastes by default. To fix it set these things in about:config
middlemouse.paste: false
general.autoScroll: true
Timing things in Bash
When building Continuous Integration YAML documents I regularly need to time how long something took.
To do this we can store the current amount of $SECONDS in a variable.
last=$SECONDSWe then define a bash function
sincelast() { duration=$(( SECONDS - last )); echo \'$1\' took $duration seconds; last=$SECONDS; }To use this you simply run:
sincelast "pecl install xdebug"and that will print
'pecl install xdebug' took 16 secondsHow I gamified unit testing my PHP framework and went from 0% unit test coverage to 93% in 30 days
In 2018 I was taking a break from work. I wanted to upgrade my skills while looking for new opportunities. My previous job was working in a NodeJS environment which I certainly enjoy in many ways but PHP is actually my favorite language to work with so I wanted to challenge myself to learn something new.
I had two goals really. The first was to learn. I wanted to see what continuous integration was actually all about. The second was to prove the rock solid design of the ORM library I've been using for the past five years. It was passed around by a few local developers I knew but using it in production on new projects became an increasingly hard battle as most people wanted to use other ORMs that were more popular. It felt like without unit tests and a code coverage badge and a page on packagist I had no legitimacy. With that in mind I got to work.
With this post I hope to write down what I learned in a clear, concise, and easy to understand way for moderately experienced PHP developers and for myself.
Code Coverage
Code coverage is a line by line yes/no report from PHPUnit that simply says if that line has been tested or if it has not. You can get a code coverage report on your own computer just by running PHPUnit with XDebug enabled. Just add the command line switch --coverage-clover clover.xml when you run PHPUnit.

Here you can see I'm telling phpunit where to put the code coverage report. You will need Xdebug as well for the feature to be available. A clover.xml file by itself though is just raw data and without a proper interface to view it you won't really be able to make much use of it.
View the Code Coverage Report
One website which provides this is Codecov.io
They give you a simple to use bash install script.
You can run it right now with the report you already generated right in the terminal.

You should probably sign up at this point and claim your free private repository. If your project is open-source you can have as many as you want!
Once signed up you will find the token in the repository settings. They give you a few ways to specify the token there.

Now you can run the report uploader script from above again.

Now that it uploaded you can take a look at the report.

As you can see my initial commit had terrible code coverage. The code was still not even organized as per PSR-4 and PHP League standards but at least I had base line and there's no where to go but up.
The PHP League
The PHP League of Extraordinary Packages make a slew of excellent packages but they also provide a skeleton template available in this Git repository that documents the proper modern way of organizing a PHP project. It was invaluable to me as a reference.
It shows you how to configure badges, continuous integration, organize your source code, and lots of other best practices.
Continuous Integration
Now that we know the code coverage report works we can setup continuous integration. I'd recommend TravisCI but if you have Bitbucket premium it comes with 500 free minutes of their continuous integration solution called Pipelines. Pipelines and TravisCI are basically just plugins for Github or Bitbucket or any other host of your Git repository. They get event hooks when your code gets pushed to your Git host and then they run a bash script in a container with your code. You can then run tests, do builds, and setup other automated solutions for your source code. But how you ask? Well there's a YAML file you have to create. In this example I will show my Travis file. The source is available here.
language: php
php:
  - '7.1'
  - '7.2'

addons:
  apt:
    sources:
      - mysql-5.7-trusty
    packages:
      - mysql-server
      - mysql-client

before_install:
  #- sudo mysql -e "use mysql; update user set authentication_string=PASSWORD('divergence_tests') where User='root'; update user set plugin='mysql_native_password';FLUSH PRIVILEGES;"
  #- sudo mysql_upgrade
  #- sudo service mysql restart
  - mysql -e 'CREATE DATABASE IF NOT EXISTS test;'

install:
    # Install composer packages
  - travis_retry composer update --no-interaction --no-suggest
  - travis_retry composer install --no-interaction --no-suggest
  # Install coveralls.phar
  - wget -c -nc --retry-connrefused --tries=0 https://github.com/php-coveralls/php-coveralls/releases/download/v2.0.0/php-coveralls.phar -O coveralls.phar
  - chmod +x coveralls.phar
  - php coveralls.phar --version

before_script:
    - mkdir -p build/logs
    - ls -al

script:
  - ./vendor/bin/phpunit --coverage-clover build/logs/clover.xml

after_success:
# Submit coverage report to Coveralls servers, see .coveralls.yml
 - travis_retry php coveralls.phar -v
# Submit coverage report to codecov.io
 - bash <(curl -s https://codecov.io/bash)

 # Tell Travis CI to monitor only 'master' branch
branches:
  only: master

# Specify where the cache is so you can delete it via the travis-ci web interface
cache:
  directories:
  - vendor
  - $HOME/.cache/composer
This file basically tells Travis what to do.
- Which versions of PHP to test with.
- Which branches of the git repo to run against.
- Sets up the localhost MySQL environment for our PHPUnit tests in the container.
- Runs composer dependency installer
- Runs PHPUnit
- Uploads the code coverage report.
The best part? You get an email at the end with what got fixed or any new problems. TravisCI also runs a rudimentary static analyzer on your code bringing up problems with the source as well as your PHPDoc notation which adds even more added value to having your unit tests run automatically every time you update a given branch.
In Github you even get this view available to you all in one place.

The Road to 90%
Initially you come to the realization that your ability to increase the score through your simple and basic helper classes lets you score a few easy wins early on. Ripping out old, unused, verbose, and unclean code also lowers your total code count thereby increasing your overall coverage score. Sometimes you actually have to edit your code to make it easier to test. Standalone global code in PHP files becomes even more onerous as testing that code becomes next to impossible. Let's take a look at a few examples.
Editing your code to make it easier to test.
Here I need to fake the stream php://input which is what we parse for raw JSON data sent via POST. Doable but only by creating your own fake stream and at a different address.

But it's okay because it enabled this simple test. Which increased the coverage of that one file by 13.33%. By the way virtual streams are pretty awesome. Check out the test below.
    /**
     * @covers Divergence\Helpers\JSON::getRequestData
     */
    public function testGetRequestData()
    {
        $json = '{"array":[1,2,3],"boolean":true,"null":null,"number":123,"object":{"a":"b","c":"d","e":"f"},"string":"Hello World"}';
        vfsStream::setup('input', null, ['data' => $json]);
        JSON::$inputStream = 'vfs://input/data';

        $x = json_decode($json,true);
        $A = JSON::getRequestData();
        $B = JSON::getRequestData('object');

        $this->assertEquals($A, $x);
        $this->assertEquals($B, $x['object']);
    }
Ripping Out Old Code
Here I found a function that was previously used to manually prettify JSON used way back when PHP didn't have this functionality built in. Sometimes it's sad to delete old code. Especially when it's will written, clean, and easy to understand. But sometimes it's just time to let it go and let someone else worry about it.

Lets just say I cut a lot of random old code. This obviously had a great impact on the readability and cleanliness of the code going forward.
What I did for Database Unit Testing
Eventually I ran out of low hanging fruit testing things that had nothing to do with the database and then... it was time for the database. A number of issues came up.
- A test database would need to be created on my laptop that mirrors the TravisCI config to avoid having to write extra logic. I added a new 'testing' default config to the default database config that comes with the framework.
- I needed to add some bash terminal commands to the TravisCI file above to make it reset the database every time.
- I need a way to run some code the unit tests need to run before all the unit tests would begin to setup a bunch of fake data.
To solve this I created a class which implements PHPUnit's PHPUnit_TestListener interface. I previously wrote a post on doing this in detail.


So here we initialize our mock application and set the database connection to use the tests-mysql config.
App::setUp is actually where the mock data is created.
Fake it till you make test it
To make this database testing thing actually work I actually made a fake site that would live in the PHPUnit environment. I gave it a separate namespace in the tests namespace.

The App class from earlier? You can view it here.

As I wrote more unit tests I added more and more Tag creation stuff to this function. As I created more and more mock data attacking the more and more complex situations in my tests became easier and easier.
Lowering Code Complexity
As you get further and further into testing your code you will come to some code which has lots of complex conditional statements with multiple conditions which might potentially have any n-number of possible combinations. By breaking out your code into ever smaller and smaller methods it is possible to make every method have a very low number of combinations hopefully in the single digits.
For example the increased conditional complexity of the code below make it difficult to get tests which achieve 100% unit test coverage because you need to provide every possible permutation of conditionals and if there are more obviously there could be more conditions.

I changed the above to be a switch($options['type']) instead and broke out each type into it's own function. The new functions become much easier to test with fewer conditional permutations to keep track of.


Writing tests for these much simpler functions becomes almost trivial and the code looks much cleaner too.
Google Chat is the worst desktop chat program I have ever used
Google Chat is the worst desktop chat program that I have ever used.
How bad is it exactly? Let's just say if I had to choose between using Google Chat and signing up for Comcast I'd choose Comcast every time.
Details? Okay.
Google Chat for Desktop login opens your default browser to login

Sounds reasonable right? Wrong.
A self contained application should need no browser at all to login.
I am required to use Google Chat for work. I use Google Chrome for work and Firefox for my personal stuff. I do not ever mix the two. I do not want my personal Gmail cookies anywhere near my work Gmail cookies. Mixing the two is a recipe for my work having access to my personal logins or accidentally syncing contacts. Do I really want to accidentally pocket dial one of my coworkers? Not really.
Guess what Google Chat does?
Clicking that goes to my default browser of course. Because you're not allowed to login to your work account on a secondary browser apparently. I literally have to copy/paste it's oauth login URL to Chrome myself.
Even more ludicrous since this is all using oauth Google Chat literally hosts it's own web server on your localhost so that it can redirect to itself upon success.

And this is just the login.
What happened to sending my login info over an HTTPS connection in the background and getting a session token back? I guess that's too simple for Google.
Google Chat is not really a chat program
Unlike every chat program in existence Google Chat is actually a distant relative of the now discontinued Google Wave. Chat messages are presented to you in the form of cards. Each card is a "discussion". A discussion is part of a "chat room". It's typical for me to see messages like this:

Yea that literally just happened.
The cards can each have new posts but you'll never know because it will update a card that is above your fold so you actually have to search for the new messages by scrolling up. After three new messages an old card will jump over a new card. This behavior is not obvious so you can have many cards jumping over each other as they are updated with no way to show them all on your screen at once. At least with a normal chat program everything is in chronological order. With discussions as cards it's entirely arbitrary.
When you private message someone it doesn't follow this paradigm. It's more like a typical chat program. Presumably because someone realized how silly the above is.
Google Chat reminds you to update by making you manually reinstall the program

It doesn't even download the update for you. It opens the link in your default browser.
I have to admit this isn't what made me annoyed enough to write this post. This however did.

I was in the middle of writing a complicated reply to an ongoing discussion about a bug when this popped up. It immediately took focus away from the reply input box and with the Update button pre-selected simply hitting enter was enough to trigger it. I hadn't even looked at the screen. I was referencing something else on another screen. By the time I hit enter Google Chat had killed itself. My reply was gone.
This is what greeted me next.

It took me a second to realize what I had just done.
After actually manually opening the dmg, dragging the icon from the mount to Application, and finally opening it I was greeted with this.

Yup the normal update process for Google Chat requires you to reinstall their program. Worst of all? It forgets your login.

May as well call itself Google Sign In at this point.
Which brings me to my next point.
Google Chat regularly forgets your login credentials
Like every person that works with computers I open my laptop on Monday and expect to be able to immediately communicate with my coworkers. Instead I am greeted with a "Sign in to continue" screen yet again. Presumably because not using an oauth token for a weekend is reason enough to invalidate it.
Google Chat forgets your login on Android at random

One day when I tried to use it on my phone I got one of these. I tried resetting the cache. I tried reinstalling the app. None of this worked. Eventually what did work was removing my work "G Suites" account from my Android phone entirely and then adding it back. So I guess I have to resync my cache of emails again.
Google Chat won't let you copy an image

This is what you see when you right click on an image. I regularly go around this by taking a screen shot. Presumably some shmuck at Google thought they were being security conscious. Apparently for this person screenshots don't exist.
Google Chat lets you download files by opening them in your default browser
So when I finally do need to actually download a file because I need to preserve meta data or it's not a normal image... say a PSD or a spreadsheet. There's a download link. Of course it goes to your default browser where I'm not logged in to this G Suite account. Off to copy/paste land I go. But wait you say. Why don't you just copy/paste the link itself?

nope.
Google Chat's emoticons are basic

Okay, this one is a little tongue in cheek but hey if Discord has this so should Google Chat! Do yourselves a favor Google and allow animated GIF emoticons and you'll be on even ground with Slack.
Frankly speaking Google Chat / Hangouts for G Suites is a mess that can only be realistically called a public beta and no one serious should be using it as their primary business communication tool.
Implementing a Test Listener in PHPUnit 7
I've recently been setting up PHPUnit for my PHP Framework Divergence and one change from PHPUnit 7 from the previous versions is that the TestListener no longer extends PHPUnit\Framework\BaseTestListener class (which has been removed entirely). Instead you can use the interface PHPUnit\Framework\TestListener.
Make sure you register the listener in your phpunit.xml file.
    <listeners>
        <listener class="Divergence\Tests\TestListener" file="./tests/Divergence/TestListener.php"></listener>
    </listeners>
Here's a simple example.
<?php
namespace Divergence\Tests;

use PHPUnit\Framework\TestCase;
use PHPUnit\Framework\TestListener as PHPUnit_TestListener;
use PHPUnit\Framework\Test;
use PHPUnit\Framework\TestSuite;

class TestListener implements  PHPUnit_TestListener
{
    public function __construct() {} // does nothing but throws an error if not here

    public function addError(Test $test, \Throwable $e, float $time): void
    {
        //printf("Error while running test '%s'.\n", $test->getName());
    }

    public function addWarning(Test $test, \PHPUnit\Framework\Warning $e, float $time): void
    {
        //printf("Warning while running test '%s'.\n", $test->getName());
    }


    public function addFailure(Test $test, \PHPUnit\Framework\AssertionFailedError $e, float $time): void
    {
        //printf("Test '%s' failed.\n", $test->getName());
    }

    public function addIncompleteTest(Test $test, \Throwable $e, float $time): void
    {
        //printf("Test '%s' is incomplete.\n", $test->getName());
    }

    public function addRiskyTest(Test $test, \Throwable $e, float $time): void
    {
        //printf("Test '%s' is deemed risky.\n", $test->getName());
    }

    public function addSkippedTest(Test $test, \Throwable $e, float $time): void
    {
        //printf("Test '%s' has been skipped.\n", $test->getName());
    }

    public function startTest(Test $test): void
    {
        //printf("Test '%s' started.\n", $test->getName());
    }

    public function endTest(Test $test, float $time): void
    {
        //printf("Test '%s' ended.\n", $test->getName());
    }

    public function startTestSuite(TestSuite $suite): void
    {
        if($suite->getName() == 'all') {
            printf("TestSuite '%s' started.\n", $suite->getName());
        }
    }

    public function endTestSuite(TestSuite $suite): void
    {
        if($suite->getName() == 'all') {
            printf("TestSuite '%s' ended.\n", $suite->getName());
        }
    }
}